Hearing aids work best when they are cleaned regularly, dried properly, and checked for wax, moisture, and debris that can block microphones, receivers, and vents. If you are asking how do you clean hearing aids, the short answer is this: wipe them daily with a dry, soft cloth, brush away wax with the tool provided by the manufacturer, keep moisture out of battery compartments or charging contacts, and follow the care instructions for your specific style. Good cleaning matters because hearing aids sit in one of the warmest, wax-producing, moisture-prone places on the body, and even a small blockage can reduce sound quality, cause feedback, shorten device life, or lead people to think their hearing has worsened when the real problem is maintenance.
In practice, cleaning hearing aids is not one task but a routine. Behind-the-ear models, receiver-in-canal devices, in-the-ear aids, custom earmolds, domes, wax guards, and rechargeable systems all need slightly different handling. I have seen many devices come into clinics sounding weak or distorted, only to recover fully after a basic clean, a wax filter change, and a drying cycle. That is why this guide treats hearing aid cleaning as a general hub topic: it explains the essentials that apply to most devices, the mistakes that commonly damage them, and the maintenance schedule that helps users avoid preventable repairs. If you want clear hearing, fewer service visits, and longer-lasting equipment, consistent cleaning is not optional; it is standard care.
What cleaning a hearing aid actually involves
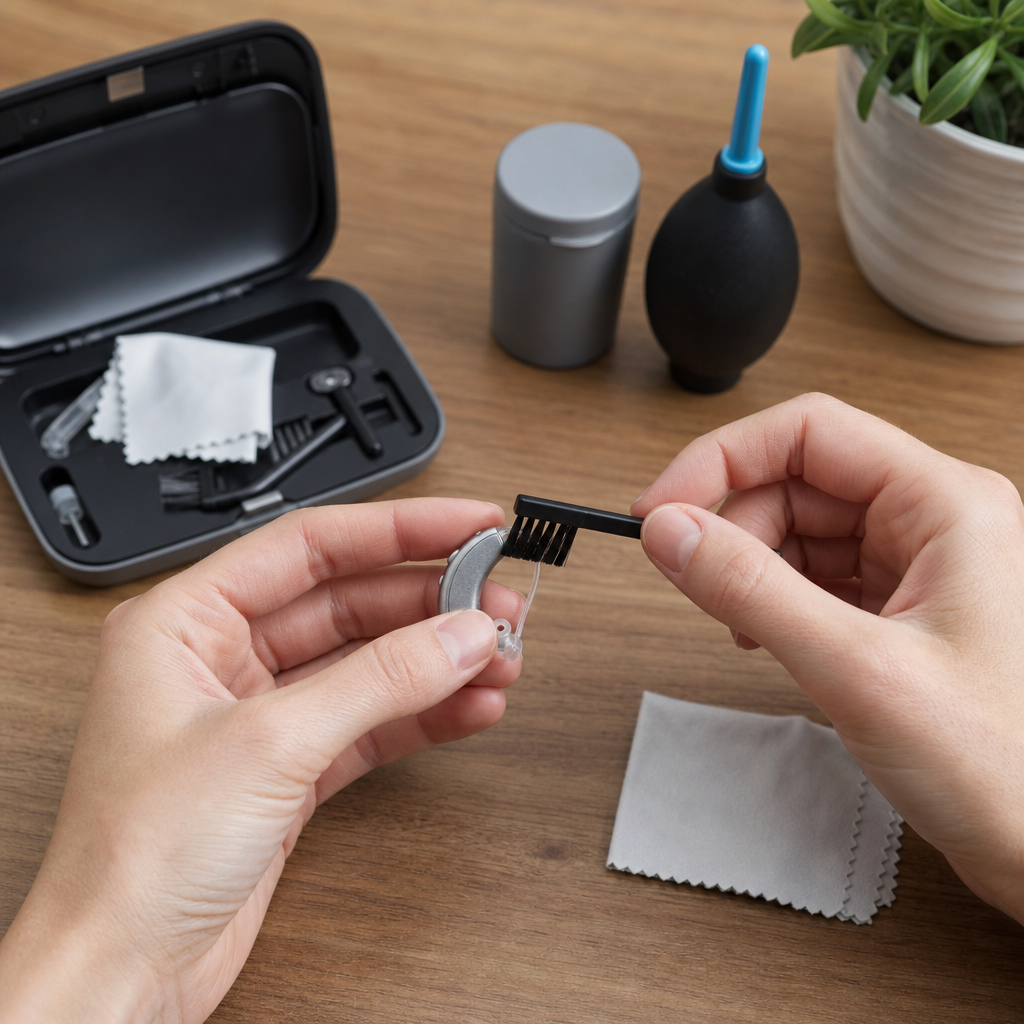
Cleaning a hearing aid means removing visible wax, skin oils, dust, and moisture without pushing debris deeper into the sound outlet or exposing delicate electronics to liquids. For most users, the process starts with clean, dry hands and a well-lit surface. Open the battery door if the aid uses disposable batteries, or turn off the rechargeable model before handling it. Then inspect the microphones, receiver opening, dome or earmold, and vent. Any visible wax around the sound outlet should be brushed away gently, with the aid angled so debris falls out rather than inward. The outer shell can be wiped with a lint-free cloth or a hearing-aid wipe approved by the manufacturer.
Different components need different methods. Hard acrylic shells on custom in-the-ear devices can usually be wiped and brushed, but they should never be soaked unless the removable earmold is specifically designed to be washed separately from the electronics. Soft silicone domes may need periodic replacement because they discolor, stiffen, or retain residue over time. Wax guards and CeruStop-type filters are consumable parts, not permanent ones; when blocked, they should be replaced rather than scraped aggressively. Rechargeable hearing aids also require attention to charging contacts, which should stay clean and dry so charging remains reliable. If a user wears hearing aids during exercise or in humid weather, drying becomes as important as wiping.
Daily, weekly, and monthly hearing aid cleaning routine
The easiest way to keep hearing aids working is to follow a simple schedule. Daily cleaning prevents buildup from hardening; weekly checks catch partial blockages; monthly maintenance reduces the chance of sudden failure. At the end of each day, remove the hearing aids, inspect them under good light, wipe the shell, and brush the sound outlet or dome. If the model uses disposable batteries, leave the battery door open overnight to reduce trapped moisture. For rechargeable devices, place them in the charger only after they are dry. A small drying cup or electronic drying system can be especially helpful for people who perspire heavily or live in humid climates.
Once a week, spend a few extra minutes checking the microphones, vents, domes, and earmolds more closely. Tubing on behind-the-ear devices should remain flexible and clear; if it turns yellow, hard, or cloudy, it likely needs replacement. Earmolds that detach from the electronics can often be washed in mild, soapy water, then thoroughly air-dried before reassembly. Never reconnect a damp earmold or tube. Monthly, review wax guards, retention locks, and charger ports, and replace disposable parts that show wear. This routine is more effective than deep cleaning only when performance drops, because by the time sound is muffled, the blockage may already be significant.
| Maintenance frequency | What to do | Why it matters |
|---|---|---|
| Daily | Wipe shell, brush sound outlet, check for wax and moisture, open battery door if applicable | Prevents buildup and reduces moisture-related failures |
| Weekly | Inspect microphones, vents, domes, tubing, and earmolds; clean removable parts properly | Catches partial blockages before sound quality drops |
| Monthly | Replace wax guards or worn domes, assess tubing condition, inspect charger contacts | Supports stable performance and extends device lifespan |
| As needed | Use a drying kit after heavy sweat, rain exposure, or high humidity | Limits corrosion and intermittent performance issues |
How cleaning differs by hearing aid style
Behind-the-ear hearing aids usually place the main electronics behind the ear, with sound traveling through tubing or a thin receiver wire into the ear canal. These devices often tolerate routine external cleaning well, but the dome, wax filter, and receiver tip need careful inspection because that is where wax accumulates first. Receiver-in-canal models are especially prone to wax blocking the receiver opening. The body behind the ear may look clean while the actual sound path is nearly sealed. In contrast, traditional behind-the-ear aids with custom earmolds can accumulate moisture or condensation inside tubing, particularly in cold weather when warm body heat meets cool outside air.
In-the-ear, in-the-canal, and completely-in-canal hearing aids sit deeper in the ear and therefore encounter more wax and skin oil. Their microphone ports are smaller and closer to contamination, so gentle brushing and precise wax guard changes matter even more. Because these custom devices are compact, users sometimes try to clean them with household cotton swabs or sharp objects, which can damage microphone covers or push debris into the receiver. That is a common cause of avoidable repair. The right method always depends on style, but the principle is consistent: remove debris from the outside first, keep moisture away from electronics, and replace wear parts on schedule rather than improvising with household tools.
Tools, products, and supplies that are safe to use
The safest hearing aid cleaning tools are usually the ones issued by the manufacturer or clinic: a soft brush, wax loop, microfiber cloth, vent cleaner, and replacement wax guards or domes sized for your model. For many users, a hearing aid dehumidifier or drying jar is worth adding, especially if devices are worn all day. Electronic drying systems gently reduce moisture and can lower the risk of corrosion in microphones and receivers. Commercial hearing-aid wipes can help remove skin oils from shells, but they should be alcohol-free unless the manufacturer specifically says otherwise. Harsh chemicals can cloud plastics, degrade coatings, and dry out soft components.
A few products should generally be avoided. Do not use hydrogen peroxide on the electronic portion of a hearing aid. Do not spray household cleaners, hand sanitizer, or perfume near microphones or receiver ports. Do not use compressed air at close range, because it can force debris deeper into the device or damage sensitive parts. Toothpicks, sewing needles, and metal picks also create risk, particularly around wax filters and microphone inlets. If an earmold is detachable and washable, mild soap and lukewarm water are usually sufficient, followed by complete drying. If the part contains electronics, water is the wrong choice. When in doubt, the device manual or audiologist should determine the method, not trial and error.
Common mistakes that make hearing aids sound weak or stop working
The most common cleaning mistake is waiting until the hearing aid sounds bad before inspecting it. Wax buildup often narrows the sound outlet gradually, so users adapt without noticing the decline. Another frequent problem is cleaning only the visible shell while ignoring wax filters, microphone ports, or vents. A hearing aid can look spotless and still perform poorly if the receiver opening is blocked. I have also seen devices come in after users wiped them with wet tissues, leaving moisture inside battery compartments or on charging contacts. Intermittent charging, sudden shutdowns, and crackling often follow. These failures are sometimes blamed on the manufacturer, but the root cause is preventable moisture exposure.
Another mistake is mixing up maintenance parts. Domes, wax guards, retention tails, and tubing are model-specific. Installing the wrong size can affect fit, comfort, sound delivery, and safety. Users also sometimes overclean by scraping filters repeatedly instead of replacing them. Once a wax guard is clogged, replacement is more reliable than trying to reopen it. Finally, many people forget that earwax production changes with season, skin condition, age, and medication use. A cleaning routine that worked six months ago may no longer be enough. If one hearing aid keeps clogging faster than the other, the answer may involve ear canal shape, wax consistency, or insertion technique, not just the device itself.
Moisture control, storage, and travel care
Moisture is one of the biggest threats to hearing aid performance because it affects microphones, receivers, battery contacts, and charging systems. Sweat during exercise, humid weather, rain, shower steam, and even rapid temperature changes can introduce condensation. The best prevention is simple: remove hearing aids before bathing or swimming, do not leave them in a bathroom during showers, and dry them before charging or storing them. Disposable-battery devices should be stored overnight with the battery door open in a safe, dry place. Rechargeable aids should be seated correctly in a clean charger, with contacts free of residue.
For travel, use a protective case rather than a loose pocket or handbag compartment. If you are flying or moving between climates, bring a brush, spare domes, wax guards, batteries if applicable, and a compact drying solution. Hot cars are a poor storage location because high temperatures can damage batteries and shell materials. If hearing aids get wet, turn them off immediately, remove the battery if possible, dry the exterior, and place them in a drying system. Avoid hair dryers or direct heat. Professional drying and inspection are the safest next steps if sound remains distorted. Fast action after moisture exposure often determines whether the device recovers or requires repair.
When to clean at home and when to see a professional
Home cleaning is appropriate for routine wax and moisture management, but some signs point to the need for professional service. If the hearing aid remains weak after replacing the wax guard, cleaning the dome, and verifying battery charge, the issue may involve the receiver, microphone, amplifier, or programming. Persistent feedback, distortion, or one-sided performance differences should also be checked. Clinics use specialized tools such as vacuum systems, test boxes, listening stethoscopes, and real-ear verification equipment to separate maintenance problems from fitting problems. That distinction matters. A user may think the device needs more volume when the real issue is a blocked receiver or damaged microphone cover.
Professional clean-and-check visits are valuable even for experienced users. Audiologists and hearing instrument specialists can replace tubing, inspect receiver wires for strain, deep-clean microphone areas safely, and measure whether the device is still meeting target output. They can also identify whether recurring wax blockage suggests a medical ear issue, such as excessive cerumen production, narrow canals, dermatitis, or poor ventilation. In those cases, cleaning the hearing aid alone will not solve the pattern. The biggest benefit of professional care is precision: it prevents users from guessing, and it keeps minor maintenance issues from becoming major repair costs. If your hearing aids are not sounding right after basic care, book a check rather than forcing the problem.
Cleaning hearing aids properly is one of the simplest ways to protect sound quality, comfort, and long-term reliability. The core routine is straightforward: wipe daily, brush away wax carefully, manage moisture, replace filters and domes when needed, and match the cleaning method to the device style. Those habits prevent the most common causes of muffled sound, feedback, charging trouble, and avoidable repairs. They also make it easier to tell the difference between a maintenance issue and a true hearing change, which is essential for anyone who depends on hearing aids every day.
As a general hub for hearing aid care, this guide gives you the baseline practices that apply to most models, whether you wear behind-the-ear, receiver-in-canal, or custom in-the-ear devices. The main benefit is consistency: small, regular steps protect an important medical device better than occasional deep cleaning. Start by building a daily and weekly routine, use only safe tools, and get professional help when basic care does not restore performance. If you have not inspected your hearing aids recently, do it today and make cleaning part of your standard hearing care.
Frequently Asked Questions
How do you clean hearing aids safely at home?
The safest way to clean hearing aids at home is to make gentle, routine care part of your daily habit. Start by turning the hearing aids off and, if your model uses disposable batteries, open the battery door before cleaning. If you wear rechargeable hearing aids, place them on a clean, dry surface and make sure the charging contacts stay free from dust and moisture. Use a soft, dry, lint-free cloth to wipe the outer shell and remove oils, sweat, and everyday buildup. Then use the small cleaning brush or wax pick provided by the manufacturer to carefully remove visible earwax from the microphone ports, receiver openings, domes, earmolds, or vents. Brush debris away from the openings rather than pushing it farther inside.
Avoid using water, alcohol, household cleaners, soaps, or disinfecting sprays directly on the device unless the manufacturer specifically says they are safe. Hearing aids contain delicate electronics, microphones, and speakers that can be damaged by liquid or harsh chemicals. If your hearing aids have removable domes or earmolds, your provider may recommend specific steps for cleaning those parts separately. The key is consistency: a quick daily wipe-down, regular wax removal, and proper drying will keep sound quality clearer and help your hearing aids last longer.
How often should hearing aids be cleaned?
Hearing aids should be cleaned lightly every day and checked more thoroughly several times each week. Daily cleaning is important because hearing aids sit in or behind the ear, where they are constantly exposed to skin oils, perspiration, moisture, and earwax. Even a small amount of wax or debris can block microphones, vents, or receivers and reduce volume, create distortion, or make the device seem like it has stopped working. A simple daily routine of wiping the hearing aids with a dry cloth and inspecting them for buildup can prevent many common performance issues.
In addition to daily care, it is smart to do a more detailed cleaning on a regular schedule based on how much wax or moisture you typically produce. Some people need to brush wax from openings every day, while others can do a deeper check a few times a week. If you live in a humid climate, exercise frequently, or naturally produce more earwax, your hearing aids may need more attention. Professional cleaning and maintenance by a hearing care provider should also be part of long-term care. Regular upkeep not only improves sound quality but can also reduce repairs and extend the life of the devices.
What should you avoid when cleaning hearing aids?
There are several things you should never do when cleaning hearing aids. First, do not rinse them under water or hold them under a faucet, even if they are labeled as water-resistant. Water resistance does not mean waterproof, and moisture that gets inside can damage sensitive internal components. You should also avoid alcohol wipes, hydrogen peroxide, bleach, harsh cleaning agents, and general household sprays unless your hearing aid manufacturer specifically approves them. These products can degrade the shell material, damage microphone covers, or leave residue that affects performance.
It is also important not to insert sharp objects into small openings. Pins, needles, toothpicks, and similar items can push wax deeper into the device or damage the microphones, receiver, or vent. Do not use a hair dryer, microwave, oven, or direct heat source to dry hearing aids. Excess heat can warp plastic parts and ruin electronics. Another common mistake is cleaning too aggressively. A light touch is best. If wax seems stuck or the device is still not working properly after cleaning, the safer move is to replace any recommended wax guard if your model uses one or contact your hearing care provider for service.
How do you keep moisture out of hearing aids and dry them properly?
Moisture control is one of the most important parts of hearing aid care because sweat, humidity, rain, and condensation can interfere with sound and damage internal electronics over time. At the end of each day, wipe your hearing aids with a dry cloth and inspect the battery compartment or charging contact area to make sure it is clean and dry. For hearing aids with disposable batteries, opening the battery door overnight can help air circulate and reduce trapped moisture. For rechargeable models, make sure the charging points are dry before placing the devices in the charger.
Many users benefit from a hearing aid dehumidifier or drying kit, especially if they live in a humid environment, exercise often, or have had recurring moisture-related problems. These drying systems are designed specifically for hearing aids and are much safer than improvised heat methods. You should also remove hearing aids before showering, swimming, or using hair products like sprays and gels. If your hearing aids get wet, turn them off, remove the battery if possible, dry the exterior gently, and follow the manufacturer’s care instructions. Taking moisture seriously can help preserve consistent amplification, prevent corrosion, and reduce unexpected device failure.
When should you get hearing aids professionally cleaned or checked?
You should consider professional cleaning or a hearing aid checkup any time your devices sound weak, distorted, intermittent, or unusually quiet after routine cleaning. A hearing care professional can inspect the microphones, receiver, tubing, wax guards, and vents more thoroughly than you can at home. They can also remove stubborn wax or debris safely, test performance, and identify whether the issue is maintenance-related or a sign that the device needs repair. If you notice feedback, reduced clarity, a plugged sensation, or visible buildup that you cannot remove, it is a good idea to schedule an appointment.
Even if your hearing aids seem to be working well, regular professional maintenance is still worthwhile. Many providers recommend periodic clean-and-check visits to keep the devices in top condition and catch small problems before they become expensive ones. This is especially helpful for people with frequent wax buildup, active lifestyles, or changing hearing needs. Professional care complements your daily home routine. In other words, the best approach is both: clean your hearing aids consistently at home and have them inspected professionally on a schedule recommended for your specific hearing aid style and usage patterns.